
We used the following calibration settings to review the 65-inch LG QNED90T (65QNED90TUA), and they're also valid for the 75-inch model (75QNED90TUA). The 86-inch model (86QNED90TUA) uses an IPS panel, so it performs differently, but our general settings should be mostly the same. These settings apply to most types of content, except for gaming or use as a PC monitor, which requires a few additional changes, listed below.
These settings are meant to provide a starting point; they're not meant to be copied 1:1. They provide the most accurate image in a moderately lit room, but you should adjust them to match your preferences and viewing conditions.
General Settings
Basic SDR Picture Settings


For SDR content, a few different preset picture modes are available. The 'Expert (Dark Space, night)' picture mode delivers the most accurate image out of the box and allows for the most customization, which we used for our calibration. 'FILMMAKER MODE' mode is a great alternative if you're a movie fan and want an accurate image. It automatically disables most of the TV's processing but also locks you out of most settings, so we don't use it for our calibration. You can also enable FILMMAKER MODE Auto Start from the Advanced Settings menu if you want the TV to automatically switch to the most accurate movie settings when it detects you're watching a movie.
From the Advanced Settings menu in the Brightness section, the Panel Brightness setting adjusts the TV's luminosity. You should adjust this to your viewing environment and personal preferences. Changing this setting has no impact on the overall picture quality. From this menu, we set AdjustContrast to '80' and left the Black Level at '50.' A Gamma (Adjust Brightness) setting of 2.2 is closest to the 2.2 gamma we target for a moderately lit room. We also left the Video Range set to 'Auto.'
Advanced SDR Picture Settings


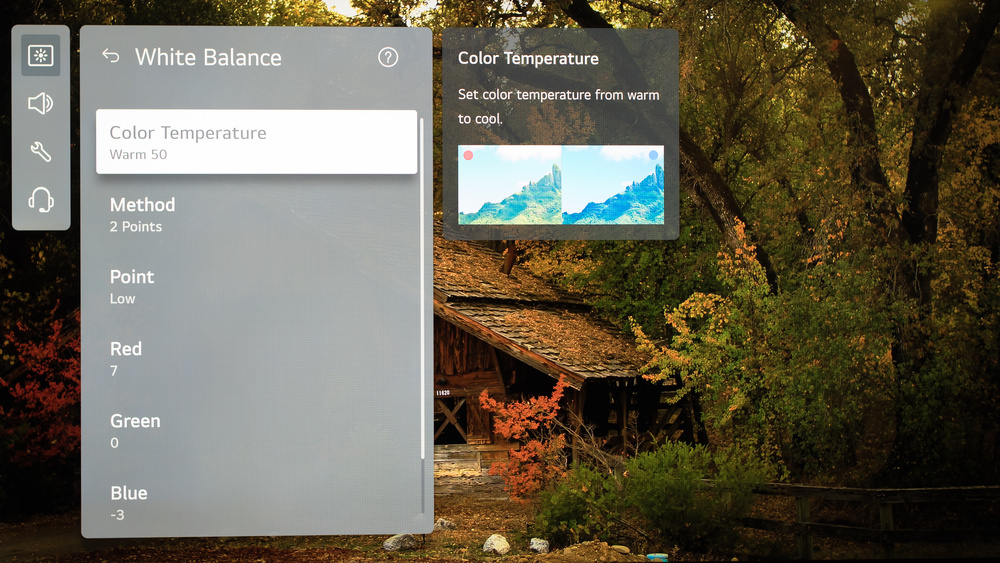
We set LED Local Dimming to 'High' for SDR content, but you can adjust this to your preference. From the Color menu, we left the Color Depth set to '50' and Tint set to '0,' as these settings are already the closest ones to the SDR calibration targets. We also left the Color Gamut set to 'Auto Detect,' but if you prefer saturated colors, setting it to 'Native' will adjust SDR content to match the HDR color gamut of the display. From the White Balance menu, we chose the 'Warm 50' Color Temperature. If you prefer a warmer or colder image, you should adjust this setting to your liking.
Finally, from the Clarity menu, we set Adjust Sharpness to '16' and enabled Super Resolution for our upscaling test, but we left the Sharpness at default and disabled Super Resolution for our other tests. We also kept the Noise Reduction, MPEG Noise Reduction, and Smooth Gradation settings disabled. Still, you should adjust these depending on the content you're watching and your preferences. These settings can help improve the appearance of low-quality content, like DVDs.
HDR


HDR is automatically enabled for native apps. Once you start playing HDR content, some settings change automatically, including Brightness. We left all settings in HDR to their defaults in the 'FILMMAKER' HDR Mode.
For HDR to work from external devices, the HDMI Deep Color option usually has to be set to '4k' from the HDMI Settings menu for your input. Although rare, older devices may have compatibility issues with this setting. If your DVD player or older console isn't working properly, try setting this to 'Off' instead.
If HDR is too dim, enable Auto Dynamic Contrast or Dynamic Tone Mapping. These settings can help produce a brighter image but are also highly dependent on the content.
HDR White Point

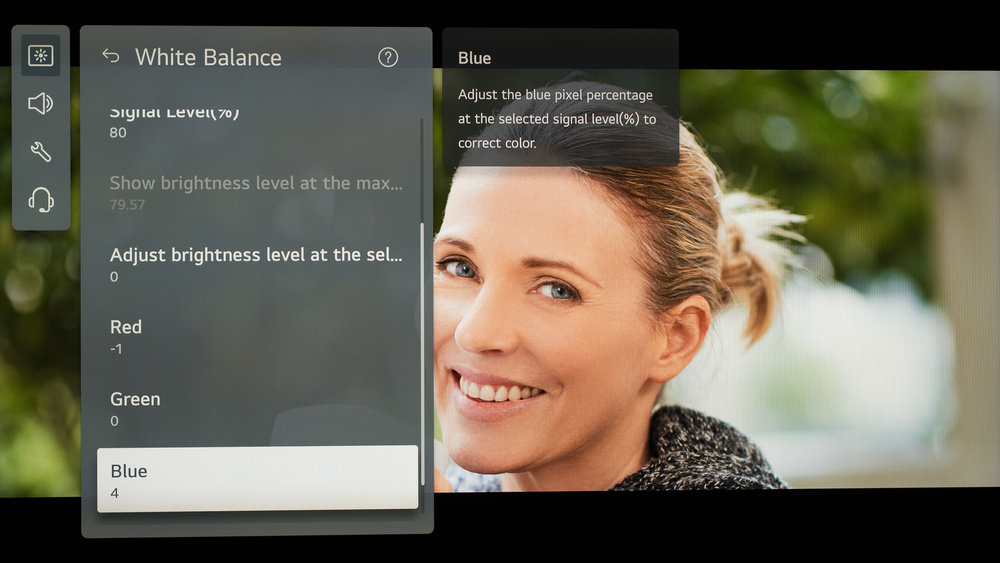
The following are the results of calibrating the white balance of our unit to 6500K in HDR. They are provided for reference and shouldn't be copied as the calibration values vary per individual unit, even for the same model and size as the TV we reviewed, due to manufacturing tolerances. If you want to try them, you'll need to enter all values shown, as all of them are active at the same time. If you have worse picture quality, simply reset them to the default values.
Dolby Vision

The LG QNED90T supports Dolby Vision from native apps and external devices. As with normal HDR content, some settings change automatically when you start playing Dolby Vision content. The 'FILMMAKER Mode' delivers the most accurate image out of the box and doesn't require any changes. If you want a brighter image or need more customization options, try out the 'Cinema Home' Picture Mode.
Motion Settings
Although we disable most motion-enhancing functions for most of our tests, you should adjust them to whatever looks best. Some settings may need to be adjusted depending on the specific content you're watching or because of your personal preferences.
Motion Interpolation


Although we usually leave these settings disabled during testing, you should adjust these settings to your liking, as different people prefer different levels of motion interpolation. If you want to enable motion interpolation, set TruMotion to 'User Selection' and adjust the De-Judder and De-Judder sliders to your personal preferences. You might have to try different content to find a setting that works best for you; higher settings on the sliders can introduce more artifacts in busier scenes. The 'Cinematic Movement' preset is a good option to reduce stutter without adding a lot of motion interpolation to the image. The Motion Pro setting enables the TV's black frame insertion (BFI) feature.
Judder
The LG QNED90T can remove judder from all sources, but you have to enable the Real Cinema setting. Note that with Motion Pro enabled, there will always be 24p judder, even with Real Cinema enabled.
Gaming Settings


Very few changes are required for a great gaming experience from the base SDR and HDR settings. When you enable Game Optimizer from the 'General' settings tab, the LG QNED90T automatically enables all game-related settings and switches to the 'Game Optimizer' Picture Mode for low latency when it's connected to a supported source, like a PS5 or Xbox Series X. For 4k @ 120Hz gaming or gaming in HDR, you need to enable HDMI Deep Color for the full HDMI 2.1 bandwidth. If Instant Game Response is enabled, the TV should do this automatically.
PC Gaming

For an optimal PC gaming experience and proper chroma 4:4:4 support, the TV offers two options. You can set the input icon to 'PC' for the HDMI port you're using from the 'Home Dashboard' menu, or you can enable the 4:4:4 Pass Through option, which you can find under 'HDMI Settings' in the External Devices menu. Both options are identical regarding the resulting image quality or input lag. Depending on the format you're sending, setting HDMI Deep Color to '4k' might also be necessary. No other settings are needed for PC Gaming, and you don't need to be in 'Game' mode for low input lag from a PC, as long as you've changed the input label.
ARC/eARC

The LG QNED90T supports both ARC and eARC, allowing it to pass high-quality audio from a connected source through to a connected soundbar or home theater receiver. To use it, you must set the HDMI Input Format to 'Bitstream,' the Digital Sound Output to 'Passthrough,' and enable eARC Support if your device supports it. To send the audio to your speaker system, you must set Use Wired Speaker to either 'Optical Out Device' or 'HDMI(ARC) Device,' depending on your connection method.
Other Settings
Energy Saving

One of the first things we did was disable all the power-saving and automatic image modes, as we didn't want the TV to adjust the image during testing. We disabled the Energy Saving and AI Service settings, and we also disabled Motion Eye Care in the Picture menu. You should adjust these settings to your preference.
Accessibility Settings

The LG QNED90T has a few accessibility features. It supports automatic closed captioning, high contrast mode, and even grayscale mode, just to name a few. There's also an option to disable the picture entirely, leaving the audio, which is great if you want to listen to music and don't need the screen on.
White Balance Settings
The following are the results of the white balance and colorspace calibration on our unit. They are provided for reference and should not be copied as the calibration values vary per individual unit, even for the same model and same size as the TV we reviewed, due to manufacturing tolerances. If you want to try them, you will need to enter all values shown, as all of them are active at the same time. If you end up with worse picture quality, simply reset them to the default values.


Recommended Articles


