
These are the settings we used to calibrate the Samsung 43" M5300 (UN49M5300) TV, and we expect our settings to be valid for the 32" version (UN32M5300), the 40" version (UN40M5300), the 49" version (UN49M5300), and the 50" version (UN50M5300). These settings are good for any content, from watching movies to TV shows and gaming. For gaming, some minor adjustments need to be done, and they are listed below.
General Settings

The first thing we did was to verify that all of the 'Eco Solution' settings from the 'General' tab in the settings menu were turn off. When turned off, the TV luminance won't change automatically depending on your room brightness.

For movies and TV content, we selected the 'Movie' 'Picture Mode', since it is the picture mode that gave us the closest result to our calibration goal and it should bring the image quality closest to what the content creator intended it be.

We set the 'Picture Size' to '16:9 Standard' with the 'Fit to Screen' option set to 'On'. The 'Fit to Screen' option allows you to fit and match the input signal without having to manually adjust the display scaling from the source output setting. It can also be useful to fully fill the screen when watching some lower resolution content, like old movies.

In our totally dark room and in order to have a luminosity close to our calibration target of 100 cd/m², we set the 'Backlight' to 6. Note here that you should change 'Backlight' to match your room lighting and it won't affect the picture quality in any way. We left the 'Brightness' to 0, its default value, and the 'Contrast' was set to 100. We left the 'Sharpness' to 0 to avoid any oversharpening and we left the 'Tint (G/R)' to its default value of 'G50 and R50'.

We left unticked the 'Digital Clean View', but if you are watching some older low-resolution content, you may want to set it on to make the content smoother. For the calibration and review purposes, we left the 'Auto Motion Plus Settings' Off (more on this later). 'Contrast Enhancer' was left turned off since we don't want to add any extra image processing so we could see movies or any other content as it was intended.

The 'Auto Motion Plus Settings' is controlling the motion interpolation (also called the soap opera effect. If you like the Soap Opera Effect, set 'Auto Motion Plus Settings' to 'custom' and then adjust the 'Judder Reduction' slider to add the amount of soap opera effect desired. You can read more about the motion interpolation feature of the M5300 here. The 'LED Clear Motion' controls the black frame insertion feature and if you want to know more about this feature you can read here on the review page.

We selected the 'Warm1' 'Color Tone' since it was the closest to our calibration goal, but you can change it to a cooler 'Color Tone' if you find the color too yellowish or red. Note that usually, on Samsung TVs, we select the 'Warm2' 'Color Tone' since it is the one that is the most accurate and closer to our desired color temperature, but on the M5300, the 'Warm1 was the most accurate out of the box.

We adjusted the 'BT.1886' gamma to +1, to reach our desired goal of a 2.2 gamma during our calibration. If you are not planning to calibrate the TV, this could be left at 0, or you could adjust it to your liking. You can increase it if you find dark scenes to be crushed.
'RGB Only Mode' is left untouched, since we don't need this function. 'Color Space Setting' was set to 'Custom' to do the calibration of the color space, but you should leave it to 'Auto' if you don't intend to calibrate the color space, as 'Auto' is generally the best setting (it will adapt depending on the source).
Gaming Settings
Usually, for playing games via a video game console or PC you would need to turn on 'Game Mode' from the 'External Device Manager' to have the lowest possible input lag, but we found out that on the M5300, the input lag under game mode is higher than on the 'Movies' picture mode, with all the processing disabled (motion interpolation, noise reduction, etc), which seems like a bug. So it is recommended to simply set the TV in 'Movie' 'Picture Mode' with all the image processing turned off to get the best input lag possible. Note that the input lag is almost the same when the 'TV input' is set to 'PC'. You can read more on our input lag measurements here.
Miscellaneous settings
If you are using your M5300 as a PC monitor and you want to enable the chroma subsampling (4:4:4), then set the input icon to 'PC' from the input menu if you want the TV to support chroma subsampling. Note that the 'PC' mode does not work for some input refresh rates like 24Hz.
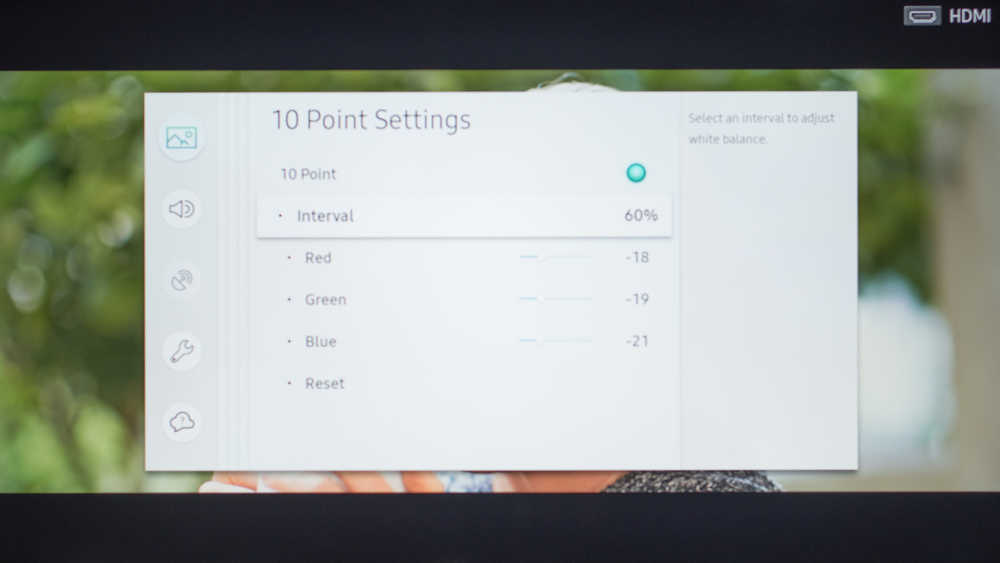
White Balance Settings
The following are the results of the white balance and colorspace calibration on our unit. They are provided for reference, and should not be copied as the calibration values vary per individual unit even for the same model and same size as the TV we reviewed due to manufacturing tolerances. If you want to try them you will need to enter all values shown, as all of them are active at the same time. If you end up with worse picture quality, simply reset them to the default values.


Recommended Articles


