
We used the following calibration settings to review the 65-inch Vizio Quantum QLED, and these settings are also valid for the 55 and 75-inch models. These settings apply to most types of content, except for gaming or use as a PC monitor, which requires a few additional changes, listed below.
These settings are meant to provide you with a starting point; they're not meant to be copied 1:1. They provide the most accurate image, but you should adjust them to match your personal preferences and viewing conditions.
General Settings
Basic SDR Picture Settings


For SDR content, we chose the 'Calibrated' Picture Mode, as it's the most accurate one out of the box and allows for the most customization. We left the Contrast to '50', Color at '50', Tint at '0', and set Sharpness to '20'. We selected the 'Warm' Color Temperature as it's closest to our calibration target of 6500K.
You should adjust the Backlight to your specific viewing conditions. Changing the backlight does not have any impact on the overall picture quality. The Brightness setting is an image processing feature that adjusts the image itself, not the panel.
Advanced SDR Picture Settings

In the Advanced Picture settings page, we left most of the settings disabled for a more accurate image. We disabled the Edge Enhancement, Active Pixel Tuning, and Black Detail settings, but you should adjust these to your preferences. We set Gamma to '2.2'. When watching low-quality content, you can adjust the Reduce Noise settings, but we left them disabled as they aren't effective.
HDR

HDR is automatically enabled for the native apps. When you start playing HDR content, the picture settings menu changes to specify the HDR format. Once you start playing HDR content, some of the settings change automatically. We used the 'Calibrated Dark' Picture Mode, as it was the most accurate one out-of-the-box, but it was clearly oversaturated, so we reduced the Color setting to '50' instead of the default '55'.
HDR White Point

The following are the results of calibrating the white balance of our unit to 6500K in HDR. They are provided for reference and shouldn't be copied as the calibration values vary per individual unit, even for the same model and size as the TV we reviewed, due to manufacturing tolerances. If you want to try them, you'll need to enter all values shown, as all of them are active simultaneously. If you have worse picture quality, simply reset them to the default values.
Motion Settings
Although we disable most motion-enhancing functions for most of our tests, you should adjust these to whatever looks best for you.
Motion Interpolation

Unfortunately, this TV doesn't have an optional motion interpolation feature. There's an optional backlight strobing feature, commonly called black frame insertion or BFI. The Clear Action setting under the Motion Control menu controls this feature.
Judder

To remove judder from the native apps or 24p sources, the Film Mode setting has to be enabled from the Advanced Picture menu.
Gaming

For the best gaming performance, switch to the TV's 'Game' Picture Mode. You can also set the Gaming/PC Mode setting to 'Auto', and the TV will automatically switch to the proper mode when it detects a connected PC or game console. This setting has to be set on each input. Unlike most TVs, we had to adjust the Color setting in 'Game', as it was clearly oversaturated with the default settings. Decreasing it to '50' delivers the most accurate results.
PC Gaming
For clear text and proper chroma 4:4:4 support from a PC, set HDMI Mode to 'Auto' and enable the Full Color 4:4:4 setting from the Input Picture Settings menu. This ensures low input lag while still displaying text properly.
ARC/eARC


This TV can pass uncompressed audio to a compatible receiver through a single HDMI connection. To enable it, enable the eARC setting and set Digital Audio Out to 'Digital'.
Other Settings
Power And Energy Saving

One of the first things we did was disable all of the extra image processing features, as we didn't want the TV to adjust the image during testing. We set the Power Mode setting to 'Quick Start'.
Accessibility Options

This TV has a good selection of accessibility features. It supports automatic closed captioning, text-to-speech, and screen zoom.
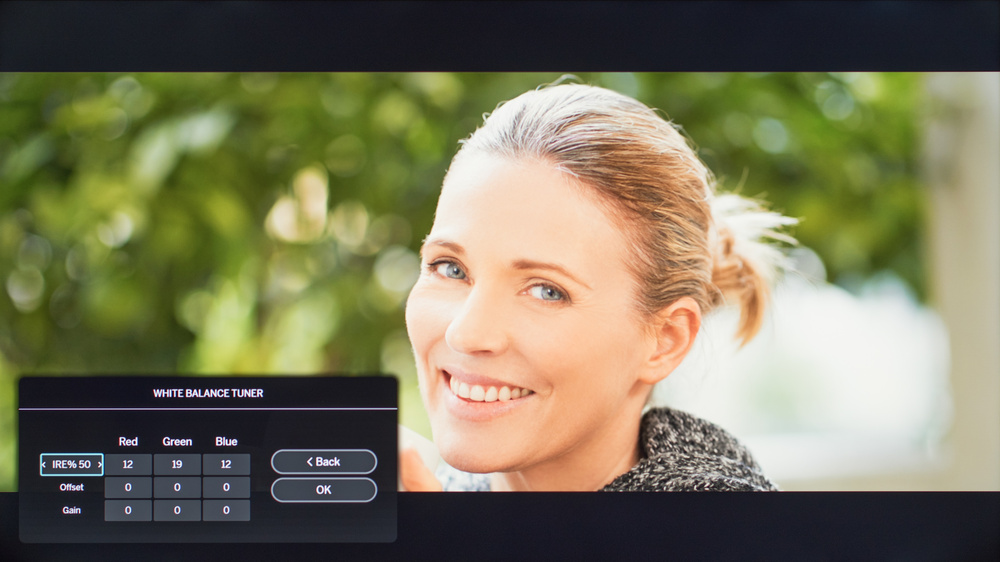
White Balance Settings
The following are the results of the white balance and colorspace calibration on our unit. They are provided for reference, and should not be copied as the calibration values vary per individual unit even for the same model and same size as the TV we reviewed due to manufacturing tolerances. If you want to try them you will need to enter all values shown, as all of them are active at the same time. If you end up with worse picture quality, simply reset them to the default values.


Recommended Articles


