
These are the settings that we used for the review process of the 43 inch Sony X720E (KD-43X720E) and should be also good for the 49" version (KD-49X720E) and the 55" version (KD-55X720E). These settings are acceptable for most content including sports, TV shows and movies. For HDR and gaming, some changes need to be made, and we are going to list them on this page.
General settings

First, we selected the 'General' 'Scene Select' since it is in this 'Scene Select' that gave us the more control over all the picture setting.

Like on other Sony TVs, we used the 'Custom' picture mode since it is the picture mode that brings us the closest to our calibration goal and gives us the most control over all the picture settings. We set the 'Brightness' to 5 to suit our totally black room but this should be adjusted to your room lighting, and it won't affect picture quality. We set the 'Contrast' to 90 for our calibration process, but this could be set to 100, especially if your TV is set in a very bright room. 'Black level' was set to 50, 'Color' to 50 and 'Hue' to 0, their default value. We selected the 'Expert 1' 'Color Temperature' since it was the color temperature that was the closest to our calibration target, but you can change for a colder color temperature if you feel the picture get too red or too yellowish. 'Sharpness' was left to 50, since at 50 on the X720E does not add any sharpness. 'Reality Creation' was left 'Off' since we did not want the alter the look of our video content, but you could turn on this feature if you are watching low-quality content and adjust the slider until you like the picture quality of this specific content.

'Mastered in 4K' optimises the picture quality of Blu-ray disks with the mention 'Mastered in 4K' by Sony and only those specific one and is only applicable to 1080p @ 24Hz signal. The 'CineMotion' was left 'Off' during our testing, and we found that even when off, 24p movies playing over 24p sources were always displayed at the good cadence. 24p movies playing from 60p/60i sources were not correctly display on the X720E with or without the 'Cinemotion' turn to 'Auto' and even in combination with any setting of the 'Motionflow' option. In any case, if you are sensitive to judder, you could set the 'CineMotion' to 'Auto', and it should not cause any problem.

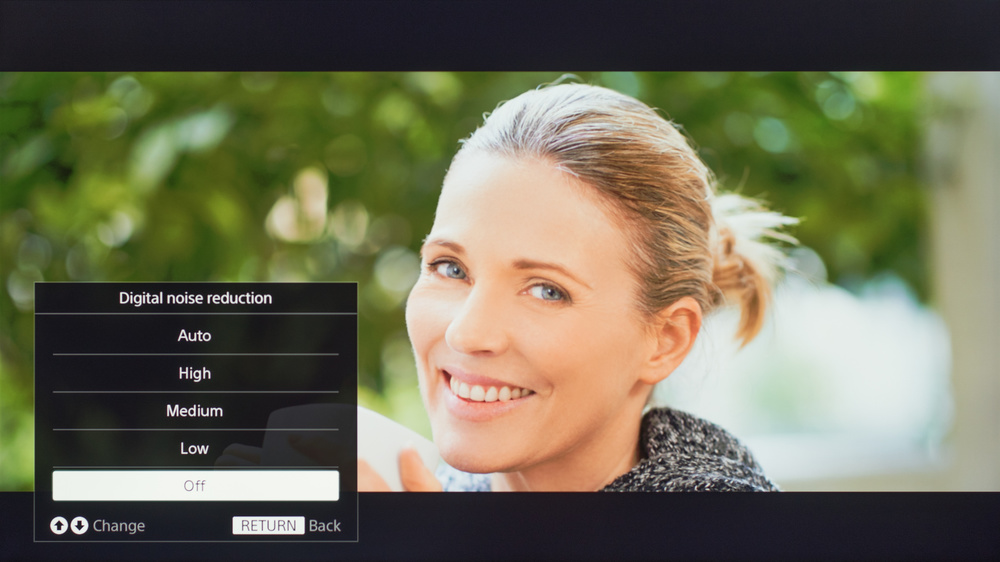
'Random noise reduction' and 'Digital noise reduction' are also recommended if you are watching some older or low-resolution content, but are not usually needed for high-quality 1080p or 4k content. Both options can be turned on to a different level, and it is up to you to adjust the level until you find the right level for the best picture quality.

'Motionflow' is the feature that controls the motion interpolation (see the review here for more information on the motion interpolation) and the black frame insertion (see the review here for more information on the black frame insertion feature). For our review process, we did not turn on this feature, but if you like the soap opera effect or if you want to clear up and reduce motion blur you will need to set the option to 'Custom'.

When the 'Motionflow' option is set to 'Custom', you will have two available option which can apply a different level with a slider. 'Smoothness' is the option that controls the motion interpolation and if you like the soap opera effect, this is the one that you will adjust to your liking. 'Clearness' is the option that controls the black frame insertion and can help to reduce motion blur. Note that when clearness is applied, the screen will dim considerably though.
In the 'Advanced settings', we left turned 'Off' 'Adv. Contrast Enhancer', 'Black adjust' and 'Live Color' since we did not want to change the original look of the video content playing and leave true as what the content creator intended. 'Gamma' was also left to 0. Here, all of those four options can help adjust the contrast of the picture and the level of detail in the shadow. If you find the picture quality to be too dark, or if you do not see enough detail in the dark area of the screen, each of those options can be useful to tweak the picture quality to your liking. But once again, remember that those options will add some image processing and will often change the original look of the video content that you are watching.
HDR Settings

One of the first thing to do before connection any HDR external devices is to turn on the 'Enhance' HDMI format for the HDMI port that will be in use. On the Sony X720E, only the HDMI port 2 and 3 can support the full HDMI bandwidth. To turn on this option, you need to go to the 'Setup' page, then 'AV Setup' and then select the 'HDMI signal format'. Once inside, simply change the format to 'Enhanced' for each HDMI port that you will use.
To correctly display HDR content, you need to select the 'HDR 'Scene select'. If the 'Scene select' is on 'Auto', the TV will change to the HDR Scene select automatically, so in that case, the 'Auto' 'Scene select' could be a good option if you are often watching both SDR and HDR content.
SDR Gaming Setting

For gaming, both the 'Game' and 'Graphic' 'Scene select' has low input lag so if you intend to game, simply choose either one of the 'Scene select'.
HDR Gaming Setting
For HDR gaming, the 'HDR' 'Scene select' has low input lag as long that the 'Motionflow' option is turned off. So just be sure that the 'Motionflow' option is off and you can game under the 'HDR' 'Scene select'. Also be sure to change the HDMI type to Enhanced, like mentioned in the HDR Settings section.
PC Monitor setting
If you want to use the Sony X720E as a PC monitor and also need the chroma subsampling (444 resolution), the 'Graphic' 'Scene select' is recommended, as the 444 resolution is displayed correctly and because the 'Frame dimming' is turned off completely.
White Balance Settings
The following are the results of the white balance and colorspace calibration on our unit. They are provided for reference, and should not be copied as the calibration values vary per individual unit even for the same model and same size as the TV we reviewed due to manufacturing tolerances. If you want to try them you will need to enter all values shown, as all of them are active at the same time. If you end up with worse picture quality, simply reset them to the default values.


Recommended Articles


